4.30.2013

Dirndl Skirt Part 4 - Finishing Your Skirt!

The majority of your hard work is done and soon you will be reaping the rewards of that hard work. Yay!

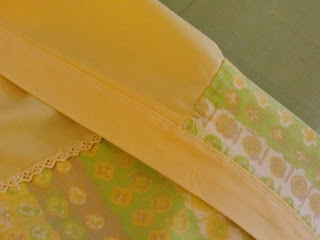
First, hem it! (I actually used the top edge of the sheet when I cut my pieces so my hem is already finished.) Remember, you factored in a 1 1/2" hem when you cut your pieces so fold and press up 1/2" inch then fold up again another 1" and press. Slip stitch by hand or do a blind stitch with your machine. Here's how to do a blind stitch hem from CraftStylish.

Next, buttons. You can break out the ruler and get all precise with your button placement, but I just eyeball it. If you want to get more technical with it here is some much more in depth information from Sewaholic. I figure if it can hold up to my overly critical eyes then surely others won't notice if something's a couple centimeters off when I'm wearing it. I just play around with the buttons until they please me:

When you're figuring out your button placement do it on the side where you will want your buttonholes to be. Lift each button and make a mark right underneath it. These marks will be where your buttonholes will go. I used the automatic buttonhole maker on my machine but you can also hand-work your button holes. Here is a great tutorial on A Fashionable Stitch. Fold your skirt in half with the two plackets lined up with each other, wrong sides together, and pin. Stick pins through each buttonhole so they come out on the other placket. Use these as guides to mark where you'll sew your buttonholes on.
You can hand sew your buttons or use your machine (tutorial from Make It & Love It).

Your skirt is now ready to rock! Wasn't that easy? And you didn't even need zippers, elastic, interfacing or a pattern! Now go make a million of these things! Easy, breezy summer skirts or warm and cozy winter skirts. You can get as intricate or be as simple as you please with this skirt, either way everyone will be impressed!
Pockets in action!

Here's another one in red, white and navy stripes:

4.29.2013

Dirndl Skirt Part 3 - Sewing Your Skirt!

All your pieces are cut so now it's time to sew!

Sew your pocket pieces (with the openings) to the pocket openings on your skirt FRONT pieces. Then sew the plackets on to the other side. Remember, 1/2" seam allowances and RIGHT sides of the fabric together while you're sewing. If you're using piping, sew that in as well. I just make sure my piping has a 1/2" s.a., sandwich it between my two fabric pieces and sew all at once (with a zipper foot). But here is an in-depth tutorial from The Colletterie should you like some more information.

Trim your allowances and clip into the curve of the pocket (so everything will lay nice and flat).

Press your pocket to the inside. Lay the remaining (solid rectangle, no pocket openings) pocket piece on top of the piece that has been sewn onto your skirt FRONT piece. Make sure that the RIGHT side of the solid piece is facing the WRONG side of the piece with the pocket opening. Sew these two pieces together on the two sides opposite the pocket opening. Finish the raw edges however you like and baste the top and side of the pockets to the top and side of the skirt FRONT.
Now you can sew your two skirt FRONT pieces to your skirt BACK piece to make one long ass rectangle. (Rectangles!) I usually like to do a french seam to join these three pieces. A french seam is basically a seam enveloped inside itself. It's easy to do on straight seams, looks fantastic and finished, and is super durable. Here Tilly (of Tilly and the Buttons) shows you step-by-step how to do a french seam. (Just remember we have 1/2" seam allowances so adjust accordingly. )

On either end of your long ass rectangle you have plackets with raw edges just waiting be to finished. Fold over that raw edge 1/2" and press:
Now fold the placket in half so that the edge you just pressed is covering the stitching you can see from where the placket it attached to the long ass rectangle. Press:
Fold the placket back open and measure out a piece of stitch witchery long enough to fit into the placket. Lay it down, fold the placket back over, and press firmly using steam:
Now you can sew on the RIGHT side of the fabric alongside the piping. This will catch the raw edge of the placket that we pressed under earlier:
Take your waistband and fold it in half lengthwise, press. Fold one raw edge 1/2" and press:
Fold the waistband in half lengthwise with the RIGHT sides together. Make sure that the edge you pressed earlier is about 1/2" above the raw edge. Sew these narrow ends together, trim, and clip the top at an angle, making sure not to clip into your stitching:
Turn your waistband right side out and use a knitting needle to make the points nice and pointy. Press:
Hand or machine baste your long as rectangle. Here is a tutorial on ruffles that is applicable to gathering your skirt. Pull your basting stitches until your skirt is roughly the length of your waistband:
Pin the raw edge of the waistband to the skirt (right sides together) making sure to keep the pressed edge out of the way:
Sew, press and flip your waistband over. See how nicely the raw edge of the skirt just slips right into the finished waistband? Nice. (Also, you can use your piping here as well. That was the plan with this skirt but I totally forgot. Oops!)
Press the waistband nice and flat, making sure that the pressed edge covers the stitching from where you attached the skirt to the waistband. (P.s. I added a lining since this fabric was really thin.) You will also want to make use of your stitch witchery again since we're not using any interfacing. Just measure out a piece as long as your waistband and slip it up to the very top (where it folds). You may need to use more than one piece depending on how wide your waistband is. Measure two more small pieces to go into the narrow ends on each side. (This makes the waistband stiffer and also gives you some reinforcement in the areas where the buttons and buttonholes will be.) Steam press firmly:
You can slipstitch (here's a how-to by Tasia of Sewaholic) the waistband or topstitch on the outside edge, catching the inside edge like this:
You're almost done! Just a little bit more to finish up and you'll have a new skirt to wear!

Dirndl Skirt Part 2 - Cutting Your Pieces

So you've done all your math and gathered your supplies, now it's time to cut!

Let's get started! I just use my measuring tape to mark out my pieces directly on the fabric but if you feel more comfortable drawing everything out on large pieces of paper (i.e. newspaper) go right ahead! (Of course, now you've just made a pattern.) Here's a visual of what we're trying to achieve:
Sometimes I lay out my measuring tape and make dots along it then cut. Sometimes I just cut alongside the measuring tape. We're only making rectangles after all, let's not make it harder than it has to be. If you're using a fabric with stripes, cutting just got easier. You've got an instant cutting guide that will help ensure perfectly straight lines!

Here's the skirt BACK being measured/cut:

21" x 16.5"
For the two skirt FRONT pieces I cut one 20" x 16.5" piece then cut it in half:
You've already determined the length of your waistband. To get the width decide how wide you want your waistband to be. Then plug it in: ____ x 2 + 1" s.a. = ____. For instance, a 1" wide waistband would come out to 3 inches.
Then cut out your plackets. 3" by the length of your skirt:
3" x 16.5"
Now for the pockets! Spread your hand out wide and flat near the corner of the fabric. Cut out a piece of fabric at least as wide as your hand and a little bit longer. (Remember? Rectangles. It's all about the rectangles.) Use this as a template to cut out three more pieces just like it.
OR fold your fabric so you have four layers and then do your measuring and cutting et voila: one cut, four rectangles. (Mine came out more like squares because I was trying to make use of scraps.)
Now take 2 of those rectangles and make your pocket opening. I like to just make a fist, put it near the corner (on the narrow end of the rectangle) and trace around it. You can make your pocket opening any shape you want. Just make sure it's going to be large enough to fit your hand through later!
 Cut your pocket opening on only these two pieces:
Lay your two skirt FRONT pieces on top of each other WRONG sides together. This is important. You want to make sure your skirt FRONT pieces are mirror images of each other. Put one of the pocket pieces (that has the pocket opening cut out) on top of your skirt FRONT pieces, in the top left corner.
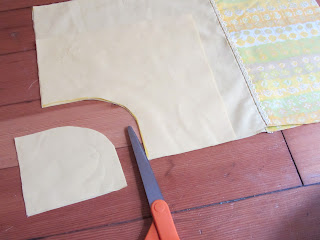
Cut along the pocket opening: 
Now you've got pocket holes!
You should now have something like this:
Next up, sewing it all together a.k.a. The Fun Part!

4.28.2013

Dirndl Skirt with Pockets and Piping - no elastic, no zippers, and NO pattern!


For my very first post here on YeYe I'm going to show you how to make a super simple dirndl skirt with a minimal amount of materials and absolutely no pattern. It is literally just five rectangles! All you need is your waist measurement and a little, tiny bit of math. This skirt is very simple but the trick to elevating it is the piping. Piping makes everything look instantly fancier. And adorable. So adorable.

Just measure your natural waist (instructions here) and fill in the blanks!
  • _____ (waist measurement) + 1" s.a. + 1" ease + 2" placket = _____  (waistband)*
  • _____ (waist measurement) x 1.5 = _____ (skirt)
  • _____ (skirt) / 2 = ____ + 1" s.a. = _____ (skirt BACK)
  • _____ (skirt) / 4 = _____ (skirt FRONT)
  • _____ (desired skirt length) + 1/2" s.a. + 1 1/2" hem = _____ (skirt length)
  • placket = 3" wide, _____ (skirt length)" long
  • pockets = see full instructions
*see full instructions for info on waistband height

We are making this skirt with 1/2" seam allowances (s.a.). Ease is what will allow you to breathe and move when you put your skirt on later, so, pretty important. If you prefer a fuller skirt (or if you have larger hips and know you'll need more room), change the 1.5 in the second line to 2. Why does the skirt FRONT measurement not have any seam allowances added? Are you stupid? Nope, not stupid, just trying to keep it simple. The placket (where the buttons go) is one inch wide (when finished). One inch is the amount of seam allowances we'd be adding to these skirt FRONT pieces. So instead of adding them and then subtracting later since we're adding width with the placket, let's skip all that and let it work itself out for us. To find your desired skirt length hold your tape measurer to your body with the 0 right at your natural waist letting it hang straight down to the floor. The number on your tape measurer in the general region where you'd like your skirt to hit is your desired skirt length.

These are the results using my own (26.5") waist measurement:
  • 29.5" waistband
  • 40" skirt (rounded up)
  • 21" skirt BACK
  • 10" skirt FRONT
  • 16.5" skirt length

Materials:
  • Fabric (e.g. bed sheets from the thrift store)
  • Scissors
  • Measuring tape
  • Buttons (the smaller they are the more you need)
  • Stitch witchery
  • Piping (store bought or make your own!)


Also suggested:

Soundtrack: Chantal Goya radio OR if you like to watch movies while you sew: Beat Girl (1960)

OK! Do your math, gather your supplies, put on some tunes and get psyched!

Next up: cutting your pieces.